centos7安装bbr开启加速
注意
1、bbr只支持使用syctemctl命令的系统,所以centos只支持7以上版本。centos6无法使用。
2、centos默认内核版本较低,需要先更新系统内核。
1、更新
yum update -y
2、查看当前内核版本
uname -r
3.10.0-1062.18.1.el7.x86_64
uname -a
Linux VM-0-2-centos 3.10.0-1062.18.1.el7.x86_64 #1 SMP Tue Mar 17 23:49:17 UTC 2020 x86_64 x86_64 x86_64 GNU/Linux
cat /etc/redhat-release
CentOS Linux release 7.8.2003 (Core)
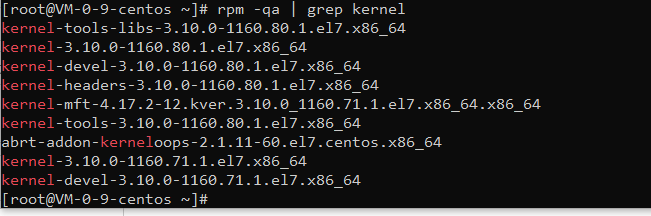
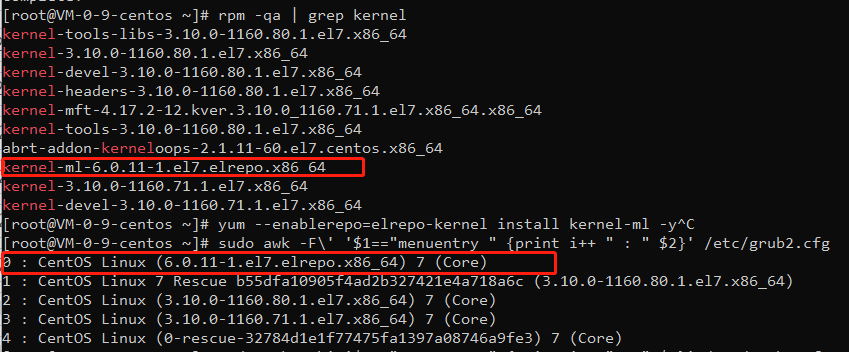
3、查看当前已安装所有内核:
rpm -qa | grep kernel
4、启用elrepo仓库:
导入公共密钥:
rpm --import https://www.elrepo.org/RPM-GPG-KEY-elrepo.org安装elrepo仓库的yum源:
rpm -Uvh http://www.elrepo.org/elrepo-release-7.0-2.el7.elrepo.noarch.rpm
5、安装最新内核版本
yum --enablerepo=elrepo-kernel install kernel-ml -y
6、查看系统已安装的所有内核,并显示序号
sudo awk -F\' '$1=="menuentry " {print i++ " : " $2}' /etc/grub2.cfg
如果:提示awk致命错误找不到文件,则需要重建内核配置文件:
grub2-mkconfig -o /boot/grub2/grub.cfg
然后在执行上面命令
例如:
0 : CentOS Linux (5.9.1-1.el7.elrepo.x86_64) 7 (Core)
1 : CentOS Linux (3.10.0-1127.19.1.el7.x86_64) 7 (Core)
2 : CentOS Linux 7 Rescue e9d53487ca824cbb8ef2b525e7aa52dc (5.8.2-1.el7.elrepo.x86_64)
3 : CentOS Linux (5.8.2-1.el7.elrepo.x86_64) 7 (Core)
4 : CentOS Linux (3.10.0-1062.18.1.el7.x86_64) 7 (Core)
5 : CentOS Linux (0-rescue-0ea734564f9a4e2881b866b82d679dfc) 7 (Core)
7、设置新版本内核为默认启动并重启,后面的数字就是上面的序号
grub2-set-default 0
8、生成配置文件并重启(必须)
grub2-mkconfig -o /boot/grub2/grub.cfg
reboot
9、验证一下是否成功更换内核
uname -r
5.9.1-1.el7.elrepo.x86_64
ok,说明更换成功
10、删除旧内核版本(可选)
rpm -ev kernel-3.10.0-1062.el7.x86_64
rpm -ev kernel-3.10.0-1062.12.1.el7.x86_64
rpm -ev kernel-3.10.0-1062.18.1.el7.x86_64
rpm -ev kernel-devel-3.10.0-1062.18.1.el7.x86_64
egrep ^menuentry /etc/grub2.cfg | cut -f 2 -d \'
11、启用bbr
egrep ^menuentry /etc/grub2.cfg | cut -f 2 -d \'
lsmod | grep bbr
modprobe tcp_bbr
echo "tcp_bbr" >> /etc/modules-load.d/modules.conf
echo "net.core.default_qdisc=fq" >> /etc/sysctl.conf
echo "net.ipv4.tcp_congestion_control=bbr" >> /etc/sysctl.conf
sysctl -p
12、检测是否成功启用bbr
sysctl net.ipv4.tcp_available_congestion_control
sysctl net.ipv4.tcp_congestion_control
看到bbr说明启用成功!
13、v2ray
参考:https://github.com/v2fly/fhs-install-v2ray
安装或更新:
bash <(curl -L https://raw.githubusercontent.com/v2fly/fhs-install-v2ray/master/install-release.sh)
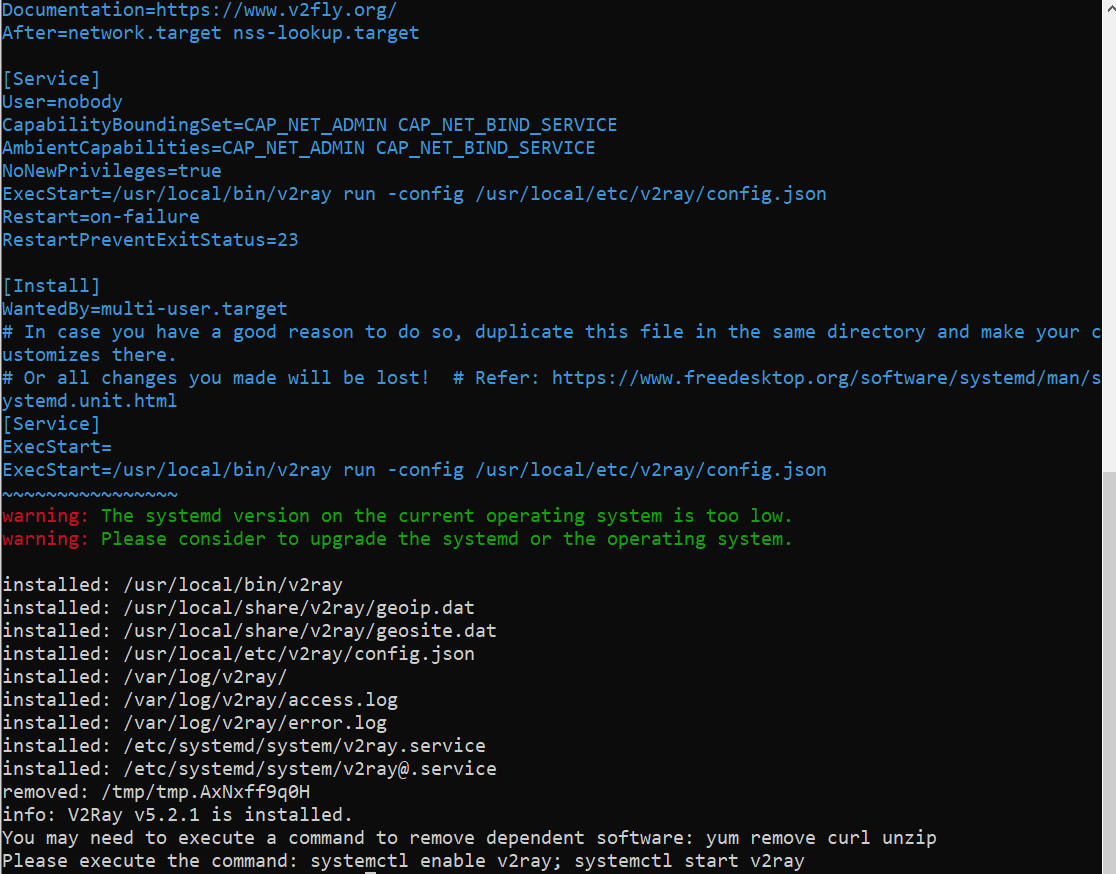
安裝最新發行的 geoip.dat 和 geosite.dat
bash <(curl -L https://raw.githubusercontent.com/v2fly/fhs-install-v2ray/master/install-dat-release.sh)
设置开机启动
systemctl enable v2ray
systemctl start v2ray
systemctl status v2ray
修改v2配置文件
vim /usr/local/etc/v2ray/config.json
{
"log": {
"loglevel": "warning",
"access": "/var/log/v2ray/access.log",
"error": "/var/log/v2ray/error.log"
},
"inbounds": [{
"port": 端口号,
"protocol": "vmess",
"settings": {
"clients": [
{
"id": "用户id",
"level": 1,
"alterId": 100
}] }, "streamSettings": { "network": "ws", "security": "none", "wsSettings": { "path": "/square" } }, "listen": "127.0.0.1"
}],
"outbounds": [{
"protocol": "freedom",
"settings": {}
},{
"protocol": "blackhole",
"settings": {},
"tag": "blocked"
}],
"routing": {
"rules": [
{
"type": "field",
"ip": ["geoip:private"],
"outboundTag": "blocked"
}
]
}
}
全套流程
1、搭建web站点,开放端口,申请ssl证书。
2、安装v2ray参考 https://github.com/v2fly/fhs-install-v2ray
3、到目录/usr/local/etc/v2ray修改v2ray 配置文件。
4、修改vhost文件,添加伪装地址跳转location /square { # 与 V2Ray 配置中的 path 保持一致
proxy_redirect off;
proxy_pass http://127.0.0.1:12345; # 假设v2ray的监听地址是12345
proxy_http_version 1.1;
proxy_set_header Upgrade $http_upgrade;
proxy_set_header Connection "upgrade";
proxy_set_header Host $host;
# Show real IP in v2ray access.log
proxy_set_header X-Real-IP $remote_addr;
proxy_set_header X-Forwarded-For $proxy_add_x_forwarded_for;
proxy_connect_timeout 60s;
proxy_read_timeout 86400s;
proxy_send_timeout 60s;
}
1 条留言 访客:0 条 博主:0 条 引用: 1 条
来自外部的引用: 1 条